

TriWowbot - Hacking a propeller into WowWee products

Project :- TriWowbot
Resources :- unwanted Wowwee TriBot - one careful owner (ebay £15 bargain)
Passion :- Three wheels have always been for me a challenge to program, so the bull was taken by the horns.
Video 1 Omni Locomotion :-

The Build Process :-
What did i start out with....
My son had control over the screwdriver .....
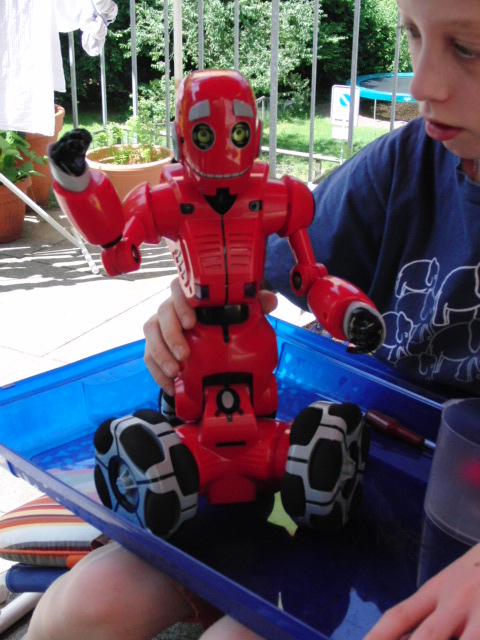
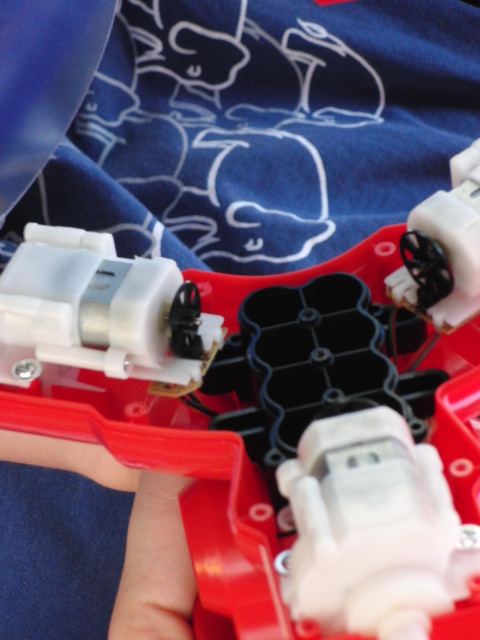
Its a really cool design and easy to Disassemble
(hats off to Wowwee, lots of sensors,a servo thingy, IR leds/ IR decoders, sockets, power transistors,battery box, etcetcetc)
This was the base drive unit i was eager to strip out.....(this in its_self is worth the £15)
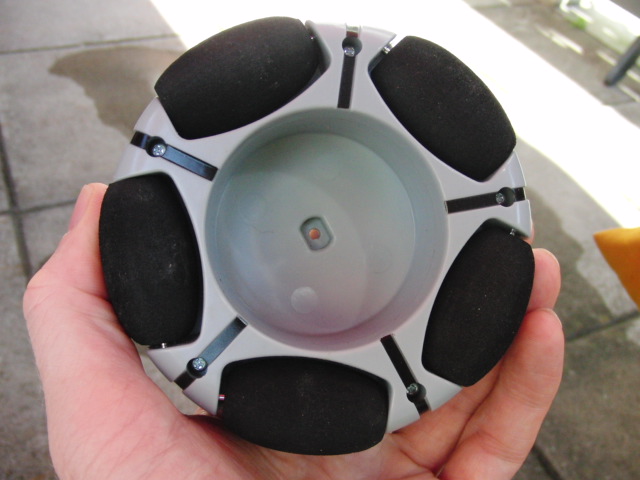
Three geared motor units with encoders..
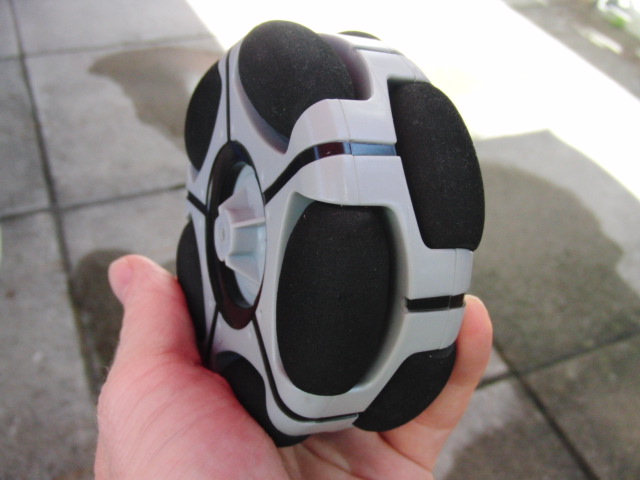
3 OmniWheels - with hard foam bogey bits......grippy on all surfaces..

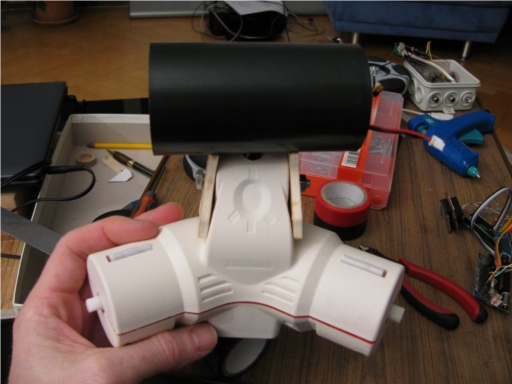
Out with the spray can and 2 coats of R2D2 "off white" colour was applied .
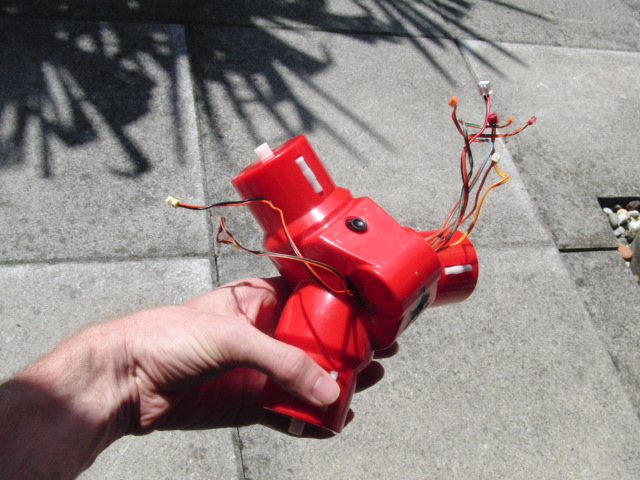
The top tube is a plastic tube carrying the Propeller mcu and new motor driver board.
One end reveals the heatsink attached to the motordriver board
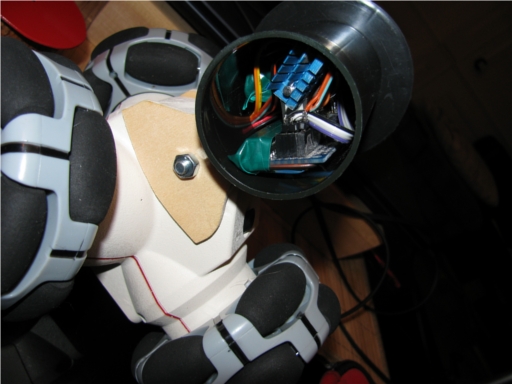
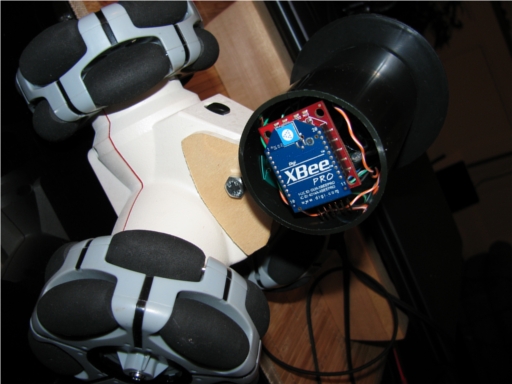
Other end reveals the XBee Pro transceiver and tucked behind the Propeller mcu.
I am using one of my favorite MBA consultings propeller M44D40+ boards , which fits like a dream.
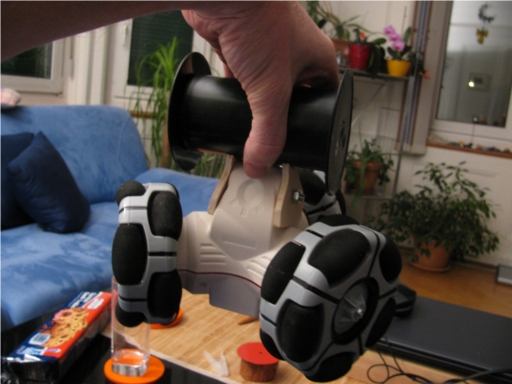
Getting a grip on things ...... its always a good idea to place a handle for quick pick up.
Conclusion :-
Tri-omniwheeled robot bases are awesome and fun/mind blowing to watch.
As you can see in the video with this form of control algorithm you can circumnavigate objects tracking one plane (ie as camera dolly fixing to central object ) easily.
Omni wheel design loves carpets.
Code ....First Hash :-
Resources :- unwanted Wowwee TriBot - one careful owner (ebay £15 bargain)
Passion :- Three wheels have always been for me a challenge to program, so the bull was taken by the horns.
Video 1 Omni Locomotion :-
The Build Process :-
What did i start out with....
My son had control over the screwdriver .....
Its a really cool design and easy to Disassemble
(hats off to Wowwee, lots of sensors,a servo thingy, IR leds/ IR decoders, sockets, power transistors,battery box, etcetcetc)
This was the base drive unit i was eager to strip out.....(this in its_self is worth the £15)
Three geared motor units with encoders..
3 OmniWheels - with hard foam bogey bits......grippy on all surfaces..
Out with the spray can and 2 coats of R2D2 "off white" colour was applied .
The top tube is a plastic tube carrying the Propeller mcu and new motor driver board.
One end reveals the heatsink attached to the motordriver board
Other end reveals the XBee Pro transceiver and tucked behind the Propeller mcu.
I am using one of my favorite MBA consultings propeller M44D40+ boards , which fits like a dream.
Getting a grip on things ...... its always a good idea to place a handle for quick pick up.
Conclusion :-
Tri-omniwheeled robot bases are awesome and fun/mind blowing to watch.
As you can see in the video with this form of control algorithm you can circumnavigate objects tracking one plane (ie as camera dolly fixing to central object ) easily.
Omni wheel design loves carpets.
Code ....First Hash :-
{{ ┌───────────────────────────────────────────┐
   │ TriWowbot basic locomotion Demo program   │
   │ Using a XBee Pro and three motors via PWM │
   │                                           │
   │ Demo Code : Gareth                        │
   │              www.parallax.com             │
   │        aka Youtube :- Chiprobot           │
   └───────────────────────────────────────────┘   }}
CON
  _clkmode = xtal1 + pll16x
  _xinfreq = 5_000_000

  _leftFW = 8
  _leftBW = 9
  _rightFW = 10
  _rightBW = 11

  _BleftFW = 12
  _BleftBW = 13
  _BrightFW = 14
  _BrightBW = 15

  _timeStepInMilliseconds = 20
  _updateFrequencyInHertz = 8_000

  _BtimeStepInMilliseconds = 20
  _BupdateFrequencyInHertz = 8_000

OBJ
  ser1   :"Parallax Serial Terminal"
  AFront : "PWM2C_HBDEngine.spin"
  BBack  : "PWM2C_HBDEngineB.spin"

Var
 long XbeeStack[10]
 long   Value1
 long   Value2
 long   Value3
 long   Value4
 long   Value5
 long   Value6
 long   Value7
 long   Value8

PUB demo | Speed,JoyBlr,JoyBud,JoyAlr,JoyAud, frequencyCounter1,frequencyCounter2 ,frequencyCounter3,frequencyCounter4

 ser1.StartRxTx(16,30, 0,57600)

 cognew(XbeeRx, @XbeeStack)

  ifnot(AFront.HBDEngineStart(_leftFW,   _leftBW,   _rightFW,   _rightBW,   _updateFrequencyInHertz))
      reboot
  ifnot(BBack.HBDEngineStart(_BleftFW, _BleftBW, _BrightFW, _BrightBW, _BupdateFrequencyInHertz))
      reboot

 Speed:=12

 repeat
      JoyAlr:=Value4
      JoyAud:=Value5
      joyBlr:=Value2
      joyBud:=Value3

     if JoyBlr < 117
           frequencyCounter1 :=(127-JoyBlr)*Speed
           AFront.leftDuty(frequencyCounter1)
           frequencyCounter2 :=(127-JoyBlr) *Speed
           BBack.LeftDuty(frequencyCounter2)

     if JoyBlr > 145
           frequencyCounter1 :=-(JoyBlr-127)*Speed
           AFront.leftDuty(frequencyCounter1)
           frequencyCounter2 :=-(JoyBlr-127)*Speed
           BBack.LeftDuty(frequencyCounter2)

     if JoyBud < 117
           frequencyCounter2 :=-(JoyBud-127)*Speed
           BBack.leftDuty(frequencyCounter2)
           frequencyCounter3 :=-(JoyBud-127)*Speed
           BBack.RightDuty(frequencyCounter3)

     if JoyBud > 145
          frequencyCounter2 :=(127-JoyBud)*Speed
           BBack.leftDuty(frequencyCounter2)
           frequencyCounter3 :=(127-JoyBud)*Speed
           BBack.RightDuty(frequencyCounter3)

     if JoyAlr < 117
           frequencyCounter1 :=(127-JoyAlr)*Speed
           AFront.leftDuty(frequencyCounter1)
           frequencyCounter2 :=-(127-JoyAlr)*Speed
           BBack.leftDuty(frequencyCounter2)
           frequencyCounter3 :=(127-JoyAlr)*Speed
           BBack.RightDuty(frequencyCounter3)

     if JoyAlr > 145
           frequencyCounter1 :=-(JoyAlr-127)*Speed
           AFront.leftDuty(frequencyCounter1)
           frequencyCounter2 :=(JoyAlr-127)*Speed
           BBack.leftDuty(frequencyCounter2)
           frequencyCounter3 :=-(JoyAlr-127)*Speed
           BBack.RightDuty(frequencyCounter3)

PUB XBeeRx
  repeat until (ser1.CharIn) == 13
  repeat
     Value1 := ser1.CharIn  '  0A,10, Start Handshake
     Value2 := ser1.CharIn  '  RightJoy Left 00<>FF Right
     Value3 := ser1.CharIn  '  RightJoy Down 00<>FF UP
     Value4 := ser1.CharIn  '  LeftJoy  Left 00<>FF Right
     Value5 := ser1.CharIn  '  LeftJoy  Down 00<>FF UP
     Value6 := ser1.CharIn  '  Both   Down = 110000
     Value7 := ser1.CharIn  '  0D,13, End Handshake
Future :- Autonomous mode using the left over Tribot sensors :-
Comments
The key to the whole motor control uses the superb PWM2C_HBDEngine.spin OBJs.(i use just three ....one spare haha)
My XBee TX unit is a radio_control box i hacked - it just reads the 4 analogue stick potentiometers and two switches and spits this serial info on the XBee transmit pipeline. The propeller simply uses the PST object to gleam the rx out of the RX XBee. (at the end of code you see i dedicated an extra cog just to do the XBee data collection).
Unfortunately i cant add any more pictures (ie schematics) to this blog due to a 10 picture limit with the editor . ;-(
Why not just add some more pictures to later posts? Like post #6?
With a little trig I was able to get my three wheeled omni robot (post #44) to travel in any direction.
Here's some of my code from '09 (I like to think I could do it better now).
x := _Stop - pulseWidth[1] + 9
      y := pulseWidth[2] - _Stop - 6

      z := _Stop - pulseWidth[3]
      x *= 2
      y *= 2
      z *= 2

      fX := FMath.fFloat(x)
      fY := FMath.fFloat(y)
      fTargetSpeed := FMath.FSqr(FMath.fAdd(FMath.fMul(fX, fX), FMath.fMul(fY, fY)))
      if x == 0
        if y > 0
          fTargetAngle := FMath.fDiv(f180r, 2.0)
        else
          fTargetAngle := FMath.fDiv(f180r, -2.0)
      else
         fTargetAngle := FMath.ATan2(fY, fX)

      fTargetFront := FMath.fMul(fTargetSpeed, FMath.Cos(fTargetAngle))
      fTargetStar := FMath.fMul(fTargetSpeed, FMath.Cos(FMath.fAdd(fTargetAngle, f120r)))
      fTargetPort := FMath.fMul(fTargetSpeed, FMath.Cos(FMath.fSub(fTargetAngle, f120r)))
      targetAngle := FMath.FRound(FMath.degrees(fTargetAngle))
      targetWheelSpeed[0] := FMath.FRound(fTargetFront)
      targetWheelSpeed[1] := FMath.FRound(fTargetStar)
      targetWheelSpeed[2] := FMath.FRound(fTargetPort)
      targetTurnSpeed := z
As you can guess from my code, I call the three wheels font, star (for starboard) and port. Most directions all three wheels move.
I'm trying to get my omnibot up and running to show to family at Thanksgiving so I'll be working on it today.
I also have a Rovio. They did a great job on that one.
Thanks for looking at my YouTube robot videos and subscribing to my channel.
I subscribed to your robot videos.
Regards,
zappman
Thanks for the code ...and.....Yes this is my next desired code iteration direction...... Kinda "Tangent" control (i think) .. Will have to brainstorm your maths and see how i can adapt...
Ah-ha yes good dodge around picture limits ...... i am still a newbie around here :-)
First weighted tabled control Algorithm - Fail
H-Bridge - pre soldering cigarette packet schematic.....
I'll see if I can explain the control algorithm I came up with.
First convert joystick reading to x and y values. Positive y is forward, positive x if to the right (like high school geometry). I think in your case you'd subtract 127 from the joystick value and change the sign if needed.
Now that you have your x and y values convert them to floating point numbers with F32.spin (a great object).
You can compute the direction you want to travel with the Atan2 method. Unlike the Atan method (which returns an angle between -90 and 90) the Atan2 method returns any angle between -180 and 180 (full circle). The Atan2 method takes two arguments, y and x, and returns the angle (I'm using degrees here but F32 uses radians, you have to convert to degrees at the end if you want to see the angles in degrees).
Now that you have the desired angle of travel you also want to know how fast to travel. I computed speed based on how far the joystick was from the center position.
In the code above I called this speed "fTargetSpeed" (I used the "f" to remind me it's a floating point number). I think the code shows how "fTargetSpeed" is computed by taking the square root of the sum of the squares of x and y.
One thing I didn't do well with my code and it's something I plan to change is the way this target speed was scaled. In the code above I just doubled the x and y values but these should really be scaled based on the value used by the speed control method.
I think in this case the target speed would be scaled by multiplying by the maximum speed the drive method accepts (I think it's 1000 for the object you're using. and then dividing by the maximum joystick deflection (I think this is 127 in your case).
Once your target speed has been scaled, will also want to compute your rotation amount (based on the second joystick). I called this "z" in the code above. z should be zero when the second joystick is centered and positive when pushed to the left (in the right hand coordinate system we're using).
You can scale z the same way as you scaled the target speed. I think I called the scaled z value "targetTurnSpeed." Looking back at my code I see all I did to scale my speeds was to multiple them by two, which worked with the joystick and motor controllers I was using.
This "targetTurnSpeed" value will be added to the calculated wheel speeds later.
Each of the three wheel speeds is then calculated based on the angle the wheel makes to the desired direction of travel.
With the coordinate system we're using, zero degrees is to the right and straight ahead is 90 degrees.
Here's the code for computing these three speeds:
fTargetFront := FMath.fMul(fTargetSpeed, FMath.Cos(fTargetAngle))
      fTargetStar := FMath.fMul(fTargetSpeed, FMath.Cos(FMath.fAdd(fTargetAngle, f120r)))
      fTargetPort := FMath.fMul(fTargetSpeed, FMath.Cos(FMath.fSub(fTargetAngle, f120r)))
The variable "f120r" is the angle 120 degrees as a floating point number that has been converted to radians ((2*pi)/3 I think).
Lets say we want to the bot to travel to the right (zero degrees). Cosine of zero is one so the font wheel would turn at the full target speed with the two other wheels turning at Cos(120) or 1/2 this speed (these two will rotate in opposite directions to each other).
After we have these three speeds you need to add the turning speed "targetTurnSpeed." The problem now is the combined speeds from moving and turning can easily exceed the maximum value so the greatest absolute speed needs to be found and scaled back to the maximum allowed. The other two speeds will also need to be scaled. The adding of the rotation speed and scaling the final speed isn't included in the above code.
Hopefully this is enough to get you started, I'd be glad to help in any way you want.
..now time to grasp the "Tan"ning process (hopefully i do not get sun blocked ;-)
Gareth,
Sorry but I miss typed. I typed "tan2", when it should have been "Atan2". We don't want the tangent, we want the arctangent. I'll fix my previous post.
"F32" is a new and improved floating point object.
F32 is a drop in replacement for the previous floating point objects. The expanded floating point object "Float32Full" used two cogs. F32 does all that Float32Full did with a single cog and runs faster than Float32Full.
You shouldn't need to change any of your code when switching to "F32" from "float32."